1. Introduction
So you have decided to build your own computer. You are in the right place and I will try and
walk you through each step from planning to powering on and back to troubleshooting.
In my day to day jobs as a Network Administrator / AskTheAdmin I am often asked the question, "How can I build my own computer?". Well actually the question usually goes a little more like hey Karl can YOU build me a GREAT, CHEAP computer?
I usually try to keep walking but the end users do eventually catch up. So I am here on behalf
of MakeUseOf.com to give you a walk through on how you can build your own cheap computer. Before we start you should know that building a computer has become A LOT easier than it was 5 years ago. Parts are easier to install, cases are readily available and there is a crap load of free support available on the internet.
I guess you don‟t need me talking you into building a computer because why else would you
be reading this E book?
But for arguments sake let's address WHY you would want to build your own computer. (When I say argument sake – I mean how to justify it to people when they point and laugh) There are lots of reasons starting with wanting to be involved of your machines creation through every aspect of its life. This is great for paranoid freaks and geeks alike!
By building your own machine you know each and every component of your machine intimately, you know all the drivers you need to get each component working and of course you are not effected by the Operating System bloat that companies like Dell and Gateway are notorious for.
You can also build a system that is geared towards exactly what YOU do.
Imagine that?
Oh and don't forget the Geek Cred you get from having a machine you built yourself! Not so
great with the ladies but hey in a room full of geeks you can get lots of ohh's and ahhh's!
A computer built by you, for you
2. Getting Started
Now that you decided to build a machine for yourself you need to ask yourself some
questions:
What do I want this machine to do? (Media Center, Desktop, Server, Etc.)
What is my total budget? Do you want to spend $500 or $2500?
Are there any pricey add-on's that you want?
Do you have any special specifications - like Low Power consumption or supporting
multiple monitors?
How familiar am I with physical computer components?
How knowledgeable am I with a specific Operating System?
Where will I build my machine? Do I have a large enough work area with power?
Do I have all the tools I will need?
Go grab a piece of paper and get your answers down! This is what we will use as a road map
to pick out our components.
Each of these questions above will help push you towards some key decisions you need to
make. They all boil down to what motherboard, processor and how much memory are going
to be added to your system first and foremost. Then they will help you pick your operating
system. The Microsoft's Windows is easier to get up and running the way you want it, but
there is the cost of the operating system then. If you go with Linux Ubuntu or another flavor
of Linux then that cost is gone and the learning curve will need to kick in.
Of course if you are already proficient in Linux than by all means jump in!
In this guide we will cover everything you will need to know to build your machine from
scratch. Before you start, if you have access to an American Express card, we suggest you
use it. This will not only add Buyers Protection in the form of replacement parts for something
you damage or destroy but if you see the parts listed cheaper after you buy them you can get
a refund!
Next let's look over the answers to the above questions and let's see how their answers will
help us pick our components. The first question is pretty straight forward.
What do you want to use this new computer for?
If it is going to be a simple computer for web browsing and email then we can go with a low
cost board and processor and keep the whole machine under $500. But if you want a Media
Center capable of running Windows Media Center Edition, play video games, and streaming
your videos over your network we will be spending quite a bit more.
After you create your list of components and the best prices you can find them for - add up
these costs and make sure you can not buy a ready made machine to these specifications
for a cheaper price. Because we all know that it SUCKS BIG TIME to take all your time and
energy to build something to find out you could have bought in to a ready made machine for
less money and formatted it to your liking.
3. Tools
You will need some specific tools to get your new machine from a pile of parts into your new
computer. You can probably make due with out them and find some other ways around them
but I find that having these tools on hand WILL make your life A LOT easier.
Needle Nose Pliers
Screwdriver with a good collection of bits. (Mainly a flat head and a Phillips but it
doesn't hurt to have some others)
A small plastic bin (or bins) to put your screws and other small parts into. You don't
want to loose parts!
A small flashlight. This one is self explanatory.
Antistatic Wrist Band. Computer components are very sensitive to static electricity.
And I always say - better safe than sorry!
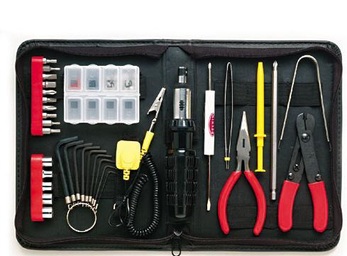
The kit shown below is a $35 set from Belkin. It is MODEL number F8E066 DESC.-BELKIN
TOOL KIT 36 pieces. It has everything you will need, except the flashlight. That you should
have lying around somewhere right?
You can find these tools individually as well as in full kits at your local hardware store, radio
shack or online at NewEgg.com or TigerDirect.com .
4. Components
http://itechstudents.weebly.com/components.html
a)Computer Case,motherboard
This is the actual case that will house all your other parts. Consider it your computers house.
It will dictate how your machine looks at first glance as well as what and how many parts you
can put into your machine. Cases range from $30 to astronomical. Some people choose to
build their own case. This is usually not cheap or easy! Please note that the motherboard
also needs to be compatible with your Case. In other words if your board will not fit into your
case you will have a big problem! I have seen this happen by over zealous individuals when
they get all excited by how awesome a case looks!
But no worries, we'll tell you how to choose the right case below.
I have used sites like Xoxide.com, ATXcases.com and NewEgg.com .
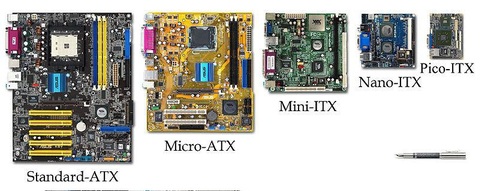
You have a lot of choices for your case; colors, sizes, number of drive bays, etc. Different
motherboards have different designations like ATX, AT, Nano ITX and Mini-ITX and now
Pico-ITX. These sizes directly correlate to the motherboards that go into them. You can see
the differences in size of this boards below.
Most motherboards are built for an ATX case because these are the most popular and
standard. Most of the PC cases you come across these days are for ATX motherboards.
They are pretty big in size like the two cases show below. You can fit lots of parts into here in
with a standard ATX board. Obviously if you don‟t need all that room you might want to opt
for a smaller case and motherboard.
5. Assembly
Alright now that you have chosen all your components we are ready to put them together!
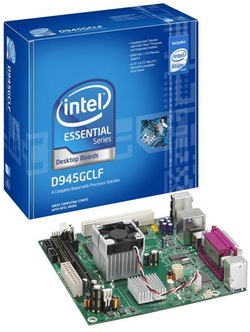
First thing you will want to do is un-wrap all your fancy new gadgets. I start with my
motherboard and then my processor and then my memory. If you get a kit like the
D945GCLF from Intel the processor is already seated in the board and you can skip this
step.
This was the last system I built. It went into a Mini-Itx case like you saw above.
If your board and processor came separate this is where we should install the processor.
This is not a hard process but you should follow the instructions that came with yours to the
letter.
Let us put on our Static Wrist protector as seen at the right.
The strap goes around your wrist and the clamp the clip onto an unpainted part of your metal computer case. This will
prevent accidental electric shocks or damage to your equipment. Always make sure the power IS NOT connected
to your case/motherboard!
a. Installing your processor
There are two types of processors that you can have a socket processor or a slot processor.
You may not know the difference between them but by looking at the pictures below you
should be able to identify your processor:
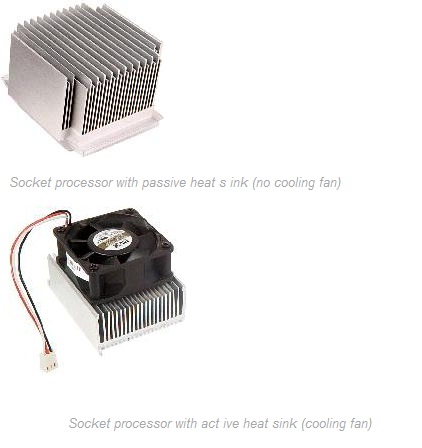
Socket processors:
Socket processors are square and covered by a heat sink.
Installing a socket processor
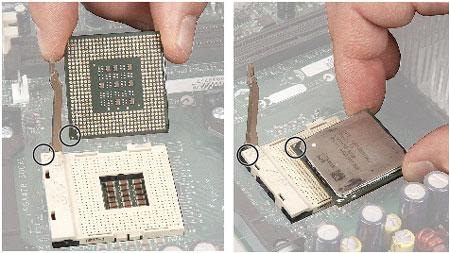
To install a socket processor:
1. Lift up the lever that is on the side of the socket. This Unlocks the mechanism and
gets it ready for you to insert the processor.
2. Carefully match up the pins on the bottom of the new processor with the holes in the
socket, and then VERY gently insert the processor into the socket. If you don‟t get it
right on the first shot – pull it straight back up, avoid bending the pins and try again.
And NOTE: Don‟t throw the processor around or fling it across the room as you try to
unwrap it!
Use the corner arrow reference marks on the processor and socket to align the
processor in the socket correctly.
Do not force the processor into the socket or you could damage the
processor. It should go in smooth and fit like a glove!
3. Press down on the lever that is on the side of the socket.
4. If your new processor already has the heat sink attached, go to Step 7. Otherwise, go
to the next step.
5. If you have a new heat sink and there is a plastic strip on the bottom of the new heat
sink, remove it.
- OR -
If you have an old heat sink and a silicon-covered thermal conductor pad came with
the new processor kit, scrape the old conductor pad off and clean the heat sink with
isopropyl alcohol. Then place the new conductor pad in the center of the old heat
sink.
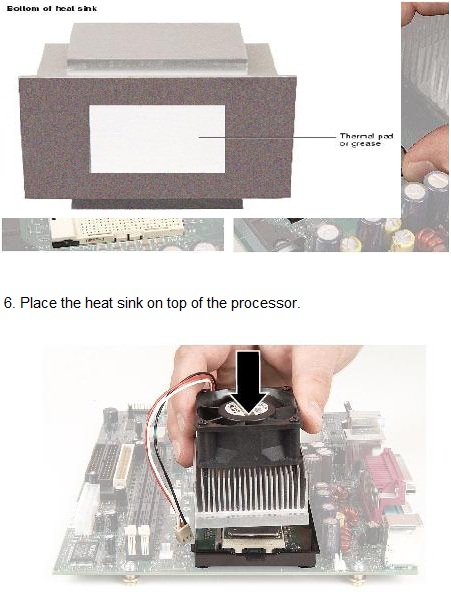
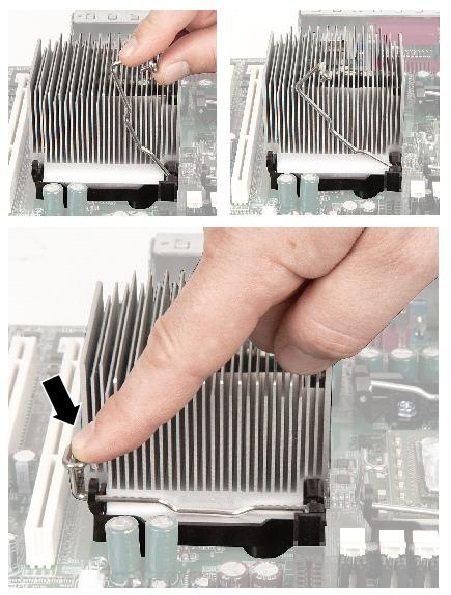
7. Close the heat sink.
Your heat sink may have one of the following retention mechanisms. Follow the
instructions that most closely resemble your heat sink.
Heat sink with removable retention clips
Your heat sink may have one of the following retention mechanisms. Follow the
instructions that most closely resemble your heat sink.
Heat sink with removable retention clips
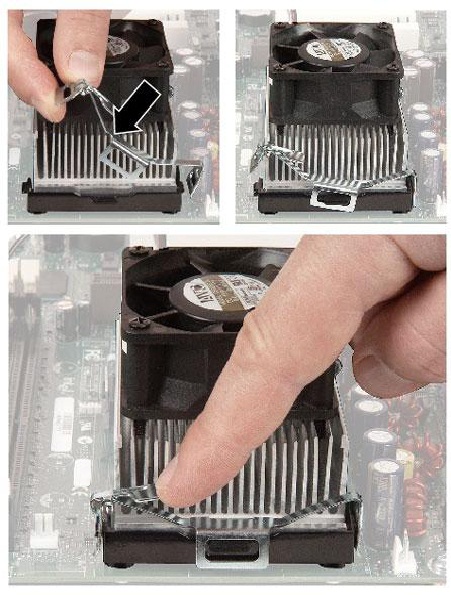
Heat sink with captive retention clips
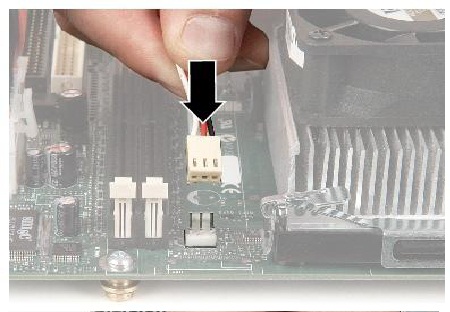
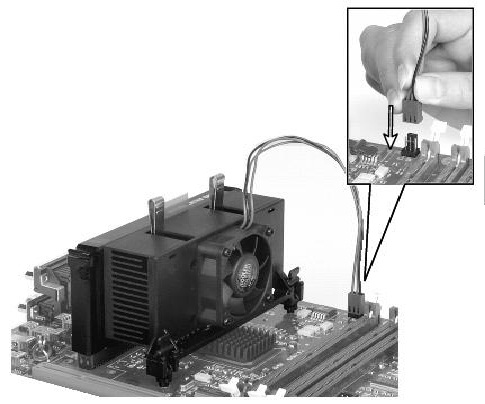
8. If the processor you are replacing has an active heat sink with a fan power cable that
connects to the system board, connect the fan power cable to the fan power cable
connector on the system board.
connects to the system board, connect the fan power cable to the fan power cable
connector on the system board.
This link also points to a detailed Youtube video on how to install a processor and a heat
sink.
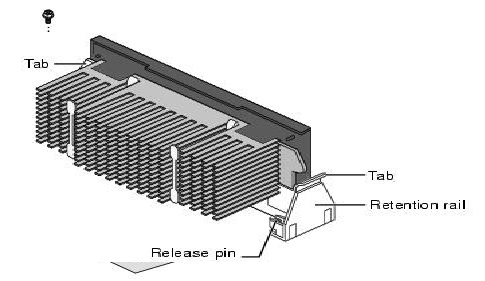
Installing a slot processor
To install a socket processor:
1. Align the processor notch with the processor connector notch, then slide the new
processor through the retention rails and into the processor slot on the system board.
1. Align the processor notch with the processor connector notch, then slide the new
processor through the retention rails and into the processor slot on the system board.
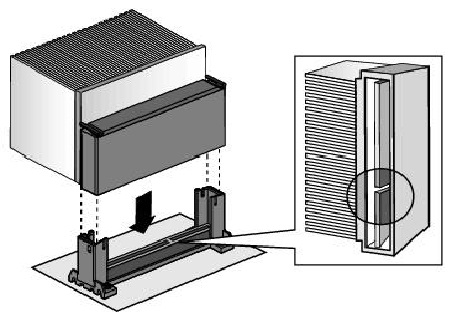
2. Push evenly on both edges until the processor is firmly seated in the processor
connector and locks into place.
3. Your slot processor may have one of the following retention mechanisms. Follow the
instructions that most closely resemble your processor.
a. If you have a pr ocessor r et enti on cap, secur e it t o t he r et enti on r ail s wit h t he
screws that you removed earlier.
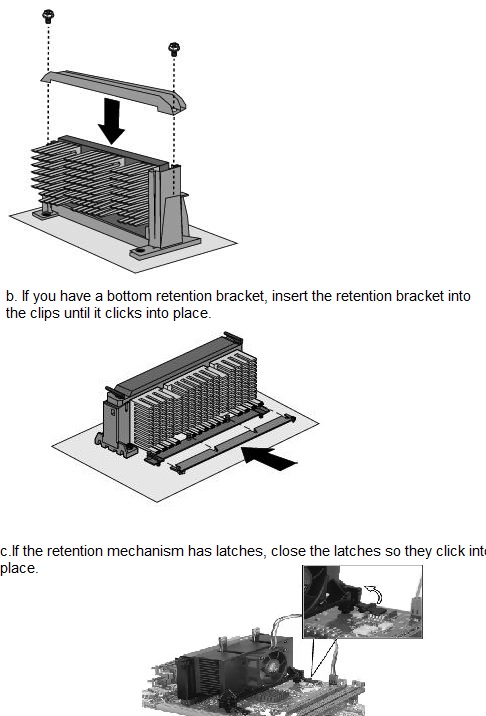
d. If the processor has tabs on the sides, make sure that when you installed the processor the tabs locked into place.
e. If you have a f ull - si ze t ower case wit h an additi onal cooli ng f an and f an duct,
place the duct tabs into the chassis slots and slide the fan duct down until the
tabs on the duct slide into the slots in the chassis. Insert and tighten the screw
on the back of the chassis that holds the fan duct in place, then connect the
fan power connector.
place the duct tabs into the chassis slots and slide the fan duct down until the
tabs on the duct slide into the slots in the chassis. Insert and tighten the screw
on the back of the chassis that holds the fan duct in place, then connect the
fan power connector.
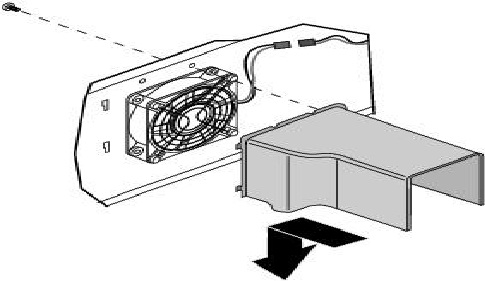
5. If your processor has an active heat sink, plug the heat sink fan power cable into the fan power cable connector on the system board.
Now that we have installed our processor in our motherboard let‟s get our memory installed.
Now that we have installed our processor in our motherboard let‟s get our memory installed.
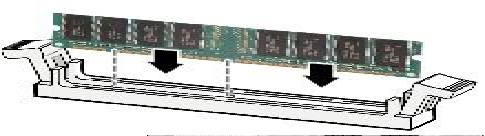
b. Installing memory modules
1. Find the memory module banks on your system board. They should look similar to what you see below. There may only be two slots instead of four as you see below.
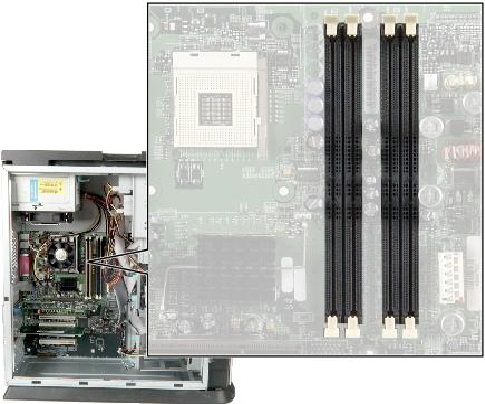
2. Align the notches on the memory module with the notches on the memory module bank, and then press the module firmly into the bank. The tabs on the sides of the module bank should secure the memory module automatically. When the module is secure, you hear a click
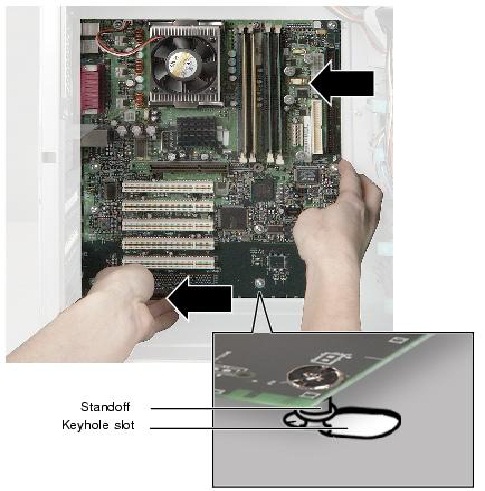
c. Installing the motherboard into your new case.
You will need to slide your board towards the back of the case. The system board standoffs slide into the keyhole slots. See the picture below for what I am talking about here.
You will need to slide your board towards the back of the case. The system board standoffs slide into the keyhole slots. See the picture below for what I am talking about here.
In case you want a visual demo, This link points to a Youtube video showing you how to install a motherboard.
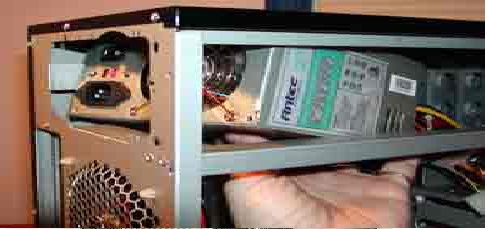
d. Installing the power supply
1. Most likely in cheaper cases your power supply will just need to be lined up and screwed in without any fancy
mechanism, but occasionally in more expensive cases there might be. In this case refer to your cases manual.
Follow the instructions that most closely resemble your power supply.
1. Most likely in cheaper cases your power supply will just need to be lined up and screwed in without any fancy
mechanism, but occasionally in more expensive cases there might be. In this case refer to your cases manual.
Follow the instructions that most closely resemble your power supply.
Below are a couple of Youtube videos showing how to install and connect the power supply:
http://www.youtube.com/watch?v=DV3eyb8qNbs
http://www.youtube.com/watch?v=GRlXpDlQUKU
http://www.youtube.com/watch?v=DV3eyb8qNbs
http://www.youtube.com/watch?v=GRlXpDlQUKU
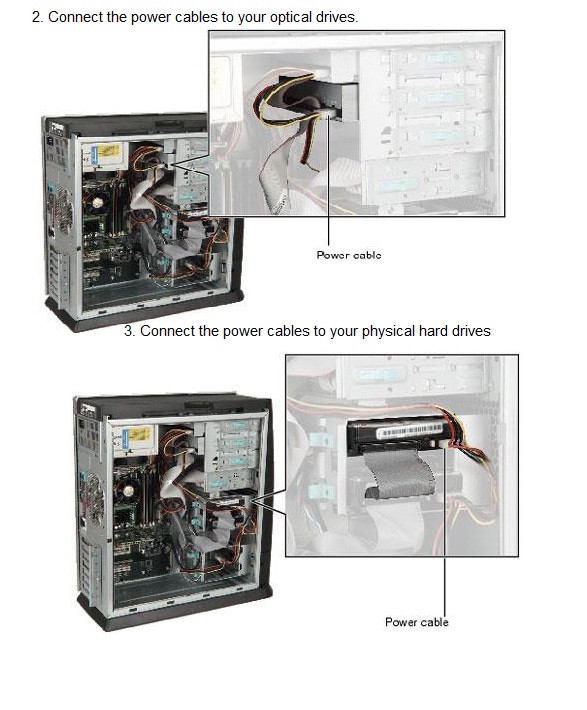
e. Connecting the power supply cables
1. There is always a big power supply cable that connects the power supply to the main
board make sure the connector locks into place.
1. There is always a big power supply cable that connects the power supply to the main
board make sure the connector locks into place.
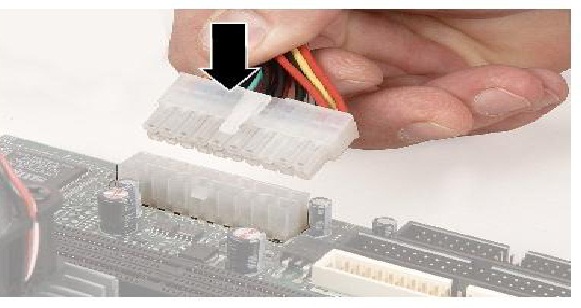
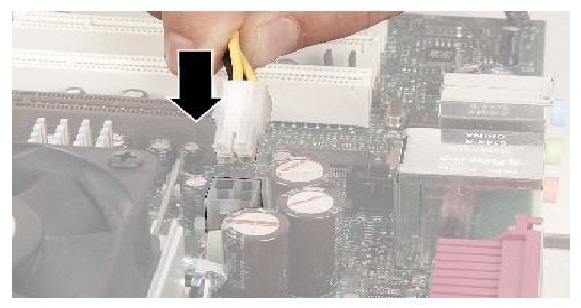
2. If you have a second, smaller power cable (Usually four round connectors on it), connect the smaller power cable to the system board as well. There is only one place it could go and make sure the cable clicks into place.
f. Installing add-in cards
http://www.youtube.com/watch?v=5ILrq7lMe-0
http://www.youtube.com/watch?v=3LND0Gqgyyk
http://www.youtube.com/watch?v=5ILrq7lMe-0
http://www.youtube.com/watch?v=3LND0Gqgyyk
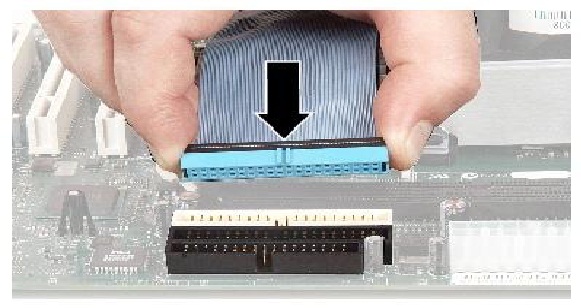
g. Connecting Hard Drive Cables to the Motherboard
The picture below shows the IDE cable side that connects to the IDE socket on the main board. The other end of this cable connects to your hard drive or optical drives.
The picture below shows the IDE cable side that connects to the IDE socket on the main board. The other end of this cable connects to your hard drive or optical drives.
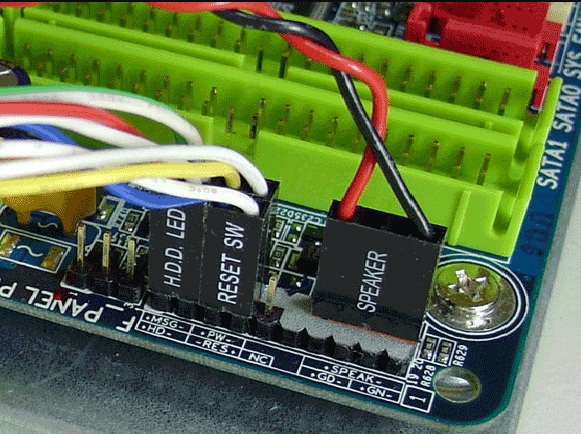
h. Connecting Case Cables to the Motherboard
With all the hardware installed correctly, follow these steps to connect the internal cabling. This is the final step. What you're going to do here is to make sure that power/standby buttons, earphone port etc that are located on the front of your case are working.
Depending on the case you got there should see a bunch of small cables coming out from it,
they should look similar to the ones below.

SPK (Speaker) – For small speaker mounted in the PC Case (if present)
PWR SW (Power switch) – Turns the PC on/off
RST SW ( Reset switch) – Resets the system
PWR LED (Power LED) – Shows when system is on (usually green)
SLP LED (Sleep LED) - Shows when system is suspended (in 'sleep' mode)
HDD LED (HDD LED) - Shows when system is accessing hard drive (usually red)
These connectors need to be connected onto a set of grouped pins on the Motherboard. At this step you will need to refer to your Motherboard manual for the connection method of these cables.